To paint aluminum, clean and prime the surface before applying acrylic or latex paint. Use a brush, roller, or spray for even coverage.
Painting aluminum can seem challenging, but with the right approach, it becomes a manageable DIY project. Aluminum surfaces are notably slick, making adhesion difficult for regular paint. Therefore, beginning with thorough cleaning to remove any dirt, grease, or oxidation is paramount.
Applying a primer designed for metal is essential, as it creates a surface that paint can adhere to effectively. After priming, choosing the right paint is crucial; acrylic or latex-based paints are often recommended for their durability and finish on metal surfaces. The method of application also matters; brushes and rollers work well for larger areas, while sprays are ideal for achieving a smooth finish on intricate or hard-to-reach spots. Following these steps can result in a professional-looking paint job that revamps your aluminum items or surfaces with a fresh, long-lasting coat.
Understanding Aluminum
Aluminum is a remarkable metal with qualities that make it extremely versatile. Painting aluminum requires a unique approach due to its special properties. By understanding its characteristics, we can prepare aluminum surfaces for long-lasting and aesthetically pleasing paint applications. Let’s dive into what makes aluminum an exceptional material.
Properties Of Aluminum
Aluminum stands out in the metal world for its specific traits. Not only is it lightweight and durable, but it also resists corrosion effectively. Recognizing these attributes is crucial when preparing to paint aluminum, as they influence the choice of paints and primers.
- Lightweight: Its low density makes it easy to handle and shape.
- Durable: Despite its weight, aluminum is strong and lasting.
- Corrosion Resistant: Its natural oxide layer protects against rust.
Common Uses Of Aluminum
Thanks to its properties, aluminum’s applications are wide-ranging. From structures to household items, its uses are plentiful. Here are a few common areas where aluminum shines:
|
Industry |
Aluminum Use |
|
Construction |
Window frames, doors, and facades |
|
Transportation |
Car frames, body panels, and wheels |
| Consumer Goods |
Kitchen utensils, cans, and electronics |
| Aerospace |
Aircraft components due to its lightweight nature |
Understanding aluminum’s basics paves the way for successful painting projects. Next, we’ll explore the prep work and techniques to paint aluminum effectively.
Preparing The Surface
Before brushing any strokes, the proper preparation of aluminum surfaces is crucial. A well-prepped surface ensures paint adherence and long-lasting finish. Let’s dive into the steps to prepare aluminum for a fresh coat of paint.
Cleaning The Aluminum Surface
Clean surfaces make for perfect painting results. Begin with removing any debris, dust, or grease from the aluminum. Use a cloth and a mild detergent to scrub the surface. Rinse thoroughly with water and allow it to dry completely.
Steps for cleaning:
- Remove loose dirt with a brush.
- Mix mild soap with water.
- Scrub with a cloth or sponge.
- Rinse well with clean water.
- Dry with a towel or let air dry.
Sanding The Surface
To enhance paint grip, sanding is essential. Sand the aluminum lightly with fine-grit sandpaper. Apply even pressure to create a slightly abraded, matte surface. Finish by wiping down with a tack cloth to remove any remaining dust.
Sanding essentials:
- Choose fine-grit sandpaper.
- Sand in one direction.
- Apply even pressure.
- Wipe off dust with a tack cloth.
Choosing The Right Paint
Preparing to paint aluminum surfaces starts with a critical step: picking the right paint. Aluminum, known for its smooth and nonporous characteristics, requires specific types of paint for a durable finish. Factors like weather resistance, drying time, and paint application need consideration to achieve the best results. Understanding the types of paint suitable for aluminum and the considerations for selection ensures the final paint job looks professional and lasts longer.
Types Of Paint For Aluminum
- Acrylic paint: Resists weather, bonds well with aluminum.
- Epoxy paint: Waterproof, suitable for outdoor items.
- Latex paint: Easy to apply, cleans up with water.
Selecting the right type of paint is essential. The following choices are recommended for aluminum surfaces:
Considerations For Paint Selection
Several factors influence the choice of paint for aluminum:
|
Aspect |
Detail |
|
Environment |
Outdoor aluminum requires UV-resistant paint. |
|
Surface Treatment |
Pre-treated aluminum may need specific paint types. |
| Color Retention |
Choose paint that maintains color against sunlight and weather. |
|
Drying Time |
Some paints dry quickly for faster project completion. |
When selecting paint, check the label to ensure it bonds to metal and offers the needed durability and finish. Quality counts in paint selection. Always opt for premium-grade paints that offer superior adherence and longevity.
Priming The Surface
Before splashing color onto aluminum, preparing its surface is crucial. This step ensures that paint adheres properly and lasts longer. Priming forms a vital layer, docking the final paint to your aluminum piece. Let’s dive into why primer is the best friend of aluminum, and how to apply it right.
Importance Of Primer For Aluminum
Primer is not just a fancy coat; it’s a necessity for aluminum. Aluminum naturally forms an oxide layer that hinders paint adhesion. Without primer:
- Paint may peel off quickly.
- Aluminum can corrode under the paint.
- The finish won’t look smooth and professional.
A good primer will:
- Provide a layer for paint to adhere to.
- Protect the surface from moisture and rust.
- Fill in small imperfections.
Applying Primer
Applying primer on aluminum consists of a few steps:
- Clean the surface to remove dust and debris.
- Sand the aluminum lightly to create a rough surface for the primer to grip.
- Wipe down with a tack cloth to remove sanding residues.
- Apply a thin, even coat of primer.
Remember these tips:
|
Tip |
Description |
|
Use the right primer |
Choose a self-etching primer specially made for metals like aluminum. |
|
Even coats |
Apply in smooth, steady sweeps to avoid runs and sags. |
| Drying time |
Allow sufficient drying time as per the primer manufacturer’s instructions. |
| Multiple coats |
If necessary, apply a second primer coat for best results. |
Using these methods ensures a well-primed surface, ready for a stunning paint job that lasts.
Applying The Paint
Welcome to the ‘Applying the Paint’ phase of our aluminum painting guide. After surface preparation, applying the right paint in the correct way is key. Let’s ensure that fresh coat adheres well and looks great for years.
Best Techniques For Painting Aluminum
Painting aluminum is not like painting wood. These metal surfaces need special care. Use these techniques:
- Choose the right paint: Use acrylic or latex paint specifically for metal surfaces.
- Use a primer: Always start with a self-etching primer made for aluminum. It ensures strong paint adhesion.
- Apply thin coats: Work with multiple thin layers rather than one thick one.
- Use a brush or roller: For small areas, a brush works well. For larger surfaces, a foam roller gives a smooth finish.
- Even strokes matter: Keep strokes even to avoid visible lines.
- Let it dry: Give adequate time for each coat to dry before applying the next.
Avoiding Common Painting Mistakes
Common errors can lead to peeling or bubbling paint. Dodge these mistakes:
|
Mistake |
How to Avoid |
|
Skipping sanding |
Always sand the aluminum for better paint grip. |
|
Ignoring the weather |
Paint on a dry day with moderate temperatures. |
| Heavy paint coats |
Apply thin, even layers and allow drying time. |
|
Rushing the job |
Take your time for each step, especially drying. |
Drying And Curing
After the aluminum has its fresh coat of paint, it’s time for drying and curing, two crucial steps to ensure durability and a high-quality finish. Without proper drying, the paint won’t adhere well and could peel or chip prematurely. The curing process follows, solidifying the paint for long-lasting protection.
Proper Drying Time
Patience is key when drying paint on aluminum. Rushing this stage can ruin the entire job.
- Check the paint can for manufacturer-recommended drying times.
- Paint in an area with good air circulation to promote even drying.
- Avoid exposing the wet paint to direct sunlight or moisture.
- Allow at least 24 hours before handling the painted aluminum.
Curing Process For Long-lasting Finish
Curing is not the same as drying. It is the process of paint hardening at a deeper level, creating a barrier that stands up to the elements.
- Follow the paint instructions for curing times, as it varies by product.
- Wait for the paint to fully dry before starting the curing process.
- If required, apply heat as directed to enhance the curing phase.
- Test the surface gently to ensure it’s fully cured before full use.
Remember, a well-cured aluminum surface resists fading, corrosion, and wearing much better.
Finishing And Sealing
Once your aluminum has its new color, the real magic happens. Finishing and sealing are key. They protect your hard work. Your project deserves a lasting, shiny coat. Let’s explore how to add this vital layer.
Adding A Protective Clear Coat
Clear coating locks in the color. It fights off chips, scratches, and weather. Follow these steps for a tough shield:
- Choose a clear coat designed for metal.
- Clean the painted surface of any dust or oils.
- Apply the clear coat in a well-ventilated area.
- Use even strokes to cover the entire surface.
- Let it dry as per the instructions on the product.
A quality clear coat offers UV protection. This keeps the color from fading. Check that the product works with your type of paint.
Final Touches For A Professional Look
For that sleek, professional finish, attention to detail is crucial. Here’s how to give your project the pro touch:
- Inspect the surface for any missed spots or drips.
- Use a fine-grit sandpaper to smooth any inconsistencies.
- Wipe down with a microfiber cloth to remove sanding dust.
- If needed, apply another thin coat of clear finish.
Final touches might involve adding soft pads to the bottom of aluminum furniture. This prevents scratching floors. For outdoor pieces, rubber feet could prevent rusting and sliding.
Remember, the goal is durability and beauty. Take your time. Your project is worth it. A well-sealed piece shines for years.
Maintenance And Care
After transforming aluminum with a fresh coat of paint, proper maintenance is key. This section delves into maintaining that pristine look. With regular care, painted aluminum stays vibrant and protected against the elements.
Tips For Maintaining Painted Aluminum
- Regular Checks: Inspect the aluminum surface monthly for any signs of peeling or chipping.
- Avoid Abrasives: Use soft cloths or sponges to prevent scratching the paint.
- Gentle Cleaners: Opt for mild soap and water. Strong chemicals can harm the paint.
- Immediate Rinse: After cleaning, rinse thoroughly to avoid residue that can corrode the aluminum.
- Wax for Protection: Apply a thin layer of car wax quarterly to shield the paint from UV rays.
Cleaning And Touch-up Procedures
- Wash Gently: Use a sponge with soap and water to clean the surface.
- Rinse Well: Remove all soap with plenty of water.
- Dry Completely: Use a soft towel to dry the painted aluminum to avoid water spots.
- Address Damage: For small scratches, apply matching paint with a fine-tipped brush or pen.
- Professionals Help: For larger areas of damage, consider hiring a professional to ensure a seamless finish.
Environmental Considerations
When tackling a project like painting aluminum, it’s crucial to consider its impact on the environment. Careful selection of materials and disposal methods can significantly reduce your ecological footprint. Let’s dive into how you can make eco-conscious choices throughout the painting process.
Eco-friendly Paint Options
Choosing the right paint is the first step to a greener approach. Water-based paints, for instance, emit fewer harmful fumes. Look for options that boast low levels of volatile organic compounds, or VOCs. These paints are better for both the environment and your health. Labels like EcoLogo or Green Seal can guide you to more sustainable paints. When possible, also opt for recycled paint, as it helps reduce waste by giving unused paint a second life.
Proper Paint Disposal
After the job is done, handle leftover paint responsibly. Never pour paint down the drain or into the ground. It can contaminate water sources and harm wildlife. Instead, turn to your local waste management services that may offer paint recycling or safe disposal programs. If you have small amounts of paint left, open the cans and let the paint dry out. Then dispose of them with your regular trash, following any local disposal guidelines. Remember to recycle the paint cans or donate them to organizations in need.
Common Mistakes To Avoid
Painting aluminum requires precision and care. A flawless finish hinges on avoiding certain mistakes. Here’s what every DIY enthusiast and professional painter should steer clear from.
Blunders in Surface Preparation
Blunders In Surface Preparation
- Skipping Cleaning: Aluminum must be free from grime for the primer to adhere.
- Ignoring Sanding: Sanding creates a rough surface that helps the primer bond.
- Omitting Primer: Never paint directly onto aluminum; primer is essential for durability.
- Forgetting to Dry: Primer must dry fully before applying paint.
Proper preparation is the foundation of painting aluminum. Disregarding this step results in peeling and flaking paint.
Mistakes in Paint Application
Mistakes In Paint Application
- Rushing Between Coats: Patience is key. Allow each coat to dry before adding the next.
- Using the Wrong Paint: Only use paint suitable for aluminum surfaces.
- Uneven Coats: Apply paint in thin, even layers for a smooth finish.
- Ignoring the Weather: Avoid painting in extreme temperatures or humidity.
Paint application takes skill and attention to detail. Mistakes can lead to a less-than-ideal finish that might require a complete do-over. Follow these tips to ensure a sleek, professional appearance.
Health And Safety Precautions
When taking on a project like painting aluminum, safety is as crucial as the painting process itself. This section outlines the vital health and safety precautions that you should take to ensure the project is completed without any mishaps.
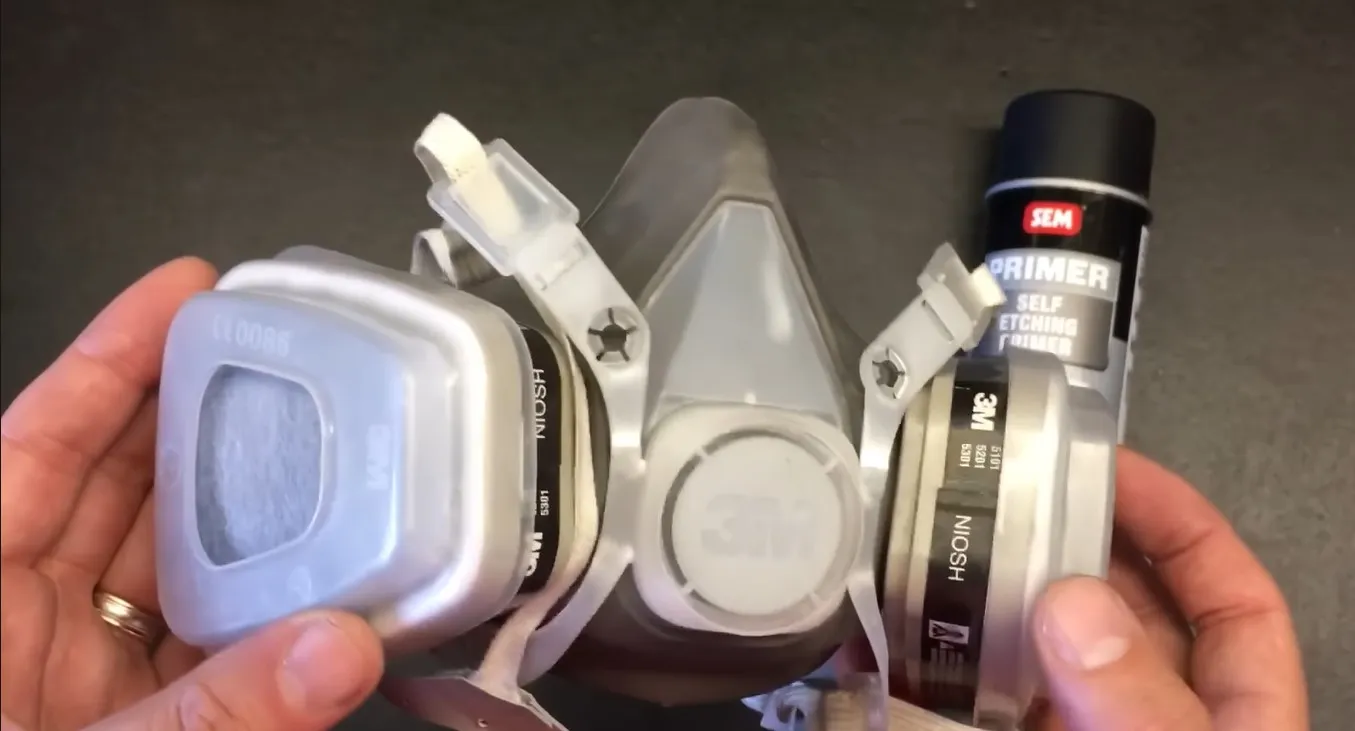
Protective Gear For Painting
Before the first stroke of paint, don the right protective gear. Paints and primers contain chemicals that can be harmful. Here’s what you need:
- Gloves: Keep chemicals off your skin.
- Goggles: Protect your eyes from splashes.
- Respirator Mask: Avoid inhaling fumes.
- Long Sleeves and Pants: Cover skin against splatters.
Ventilation And Safe Practices
Painting aluminum requires attention to airspace quality. Ensure fresh air can enter and exit the room. Here’s how to maintain a safe environment:
- Open windows and doors.
- Use an exhaust fan to expel fumes.
- Take breaks to breathe in fresh air outside.
Follow these steps for a safe and successful aluminum painting experience.
Cost And Budgeting
When embarking on a painting project for aluminum surfaces, careful budget planning ensures no unexpected expenses. Understanding the costs associated with both materials and professional services is crucial. This section delves into the nuances of financially preparing for an aluminum painting project.
Evaluating Paint And Material Costs
Choosing the right paint and materials for aluminum is a pivotal first step. The cost of high-quality paint can vary. Below is an estimate to consider:
- Primer: Essential for proper adherence.
- Acrylic latex paint: Durable and long-lasting.
- Sealant: Protects from weather damage.
Do not forget tools like brushes, rollers, and sandpaper. Costs can add up, so compare products and prices. Here’s a breakdown:
|
Material |
Quantity | Approx. Cost |
|
Primer |
1 Gal | $20-$40 |
|
Paint |
1 Gal | $30-$50 |
| Sealant | 1 Gal |
$25-$35 |
| Tools | Set |
$10-$50 |
Budgeting For Professional Assistance
If a DIY approach seems daunting, professional painters are an option. The pros bring expertise but also higher costs. Labor charges typically depend on the area’s size and painting complexity.
Before hiring a pro, get multiple quotes to compare prices. A clear contract laying out all fees prevents surprises. Expect to budget for:
- Preparation work
- Materials and paint
- Labor costs
Professionals may charge between $50 to $100 per hour. A standard project might start from $500 and go up depending on details.
Diy Vs. Professional Services
Deciding between tackling a paint project yourself or hiring a pro can be tough. When you choose to paint aluminum, there’s much to consider. The differences between a DIY approach and professional services could affect your project’s outcome and cost. Let’s dive into the pros and cons.
Advantages Of Diy Painting
Painting aluminum on your own has several benefits:
- Cost Savings: You can save money by avoiding labor costs.
- Flexibility: Work at your own pace and on your schedule.
- Satisfaction: Feel proud of completing a home improvement task.
It’s essential to weigh these advantages against the required skill and time commitment.
Benefits Of Hiring A Professional
Professional painters bring a lot to the table:
|
Benefit |
Description |
|
Expertise |
Pros have the skills for a flawless finish. |
| Efficiency |
They complete the job quickly and effectively. |
| Quality |
They know the best paints and techniques for aluminum. |
Professional services can offer peace of mind and durability that might outweigh upfront costs.
Case Studies
Exploring real-life examples can shed light on the best practices for painting aluminum. These case studies highlight not only the success stories but also the hurdles encountered and how they were tackled. By understanding these scenarios, one can grasp the practical aspects of aluminum painting.
Successful Aluminum Painting Projects
Numerous projects stand testament to the effectiveness of proper aluminum painting techniques. Success hinges on careful preparation, savvy paint selection, and meticulous application.
- Commercial Building Facades: Transforming tired exteriors into vibrant, protective shields.
- Home Gutters and Downspouts: With the right approach, they now repel water and resist corrosion beautifully.
- Boats and Marine Equipment: Specialized coatings withstand the rigors of the watery realm.
Challenges Faced And Overcome
Each success was born from adversity. Common challenges include weather fluctuations and surface contaminants.
|
Challenge |
Solution |
|
Uneven Coating |
Methodical surface preparation and priming |
| Adhesion Issues |
Using self-etching primers for better bond |
|
Drying Time Problems |
Adjusting the paint formula and application environment |
Case studies show resilience is key. Each obstacle provides a learning opportunity, while tailored solutions ensure the longevity of aluminum paint jobs.
Future Trends In Aluminum Painting
Exploring the exciting frontier of aluminum painting, it’s clear the future holds promising developments. Innovations in paint technology elevate both the performance and aesthetic appeal of aluminum surfaces. These advances ensure aluminum continues to be a versatile material across various industries.
Advancements In Paint Technology
The race to create more durable, eco-friendly paints is leading the charge. Here’s how:
- Nano-coatings offer superior protection and longevity.
- Low-VOC formulas ensure a safer, greener painting process.
- Heat-reflective paints enhance energy efficiency.
Breakthroughs in self-healing paints repair scratches, reducing maintenance needs.
Innovative Applications In Different Industries
Aluminum’s versatility shines with these industry-specific paint applications:
|
Industry |
Application |
|
Automotive |
Reflective paints for better visibility |
|
Construction |
Thermal barriers in exterior paints |
| Aerospace |
Anti-corrosive coatings for aircraft |
Smart paints in tech gadgets change hues with a tap. It showcases aluminum’s adapted functionality.
Conclusion
Wrapping up, painting aluminum can be a satisfying DIY project with the right approach. By following the outlined steps, selecting appropriate primers and paints, and allowing sufficient drying time, your aluminum surfaces will sport a fresh, durable finish. Tackle your next painting venture with confidence, armed with these insights.